


How to Post from Instagram to a Facebook Business Page
We marketers often talk about using social media for marketing, and I know I personally recommend Facebook for pretty much everyone. Instagram isn’t quite as all-encompassing, but it’s also a good platform to use. When you use them both, you get one neat benefit that comes from the fact they’re both owned by Facebook: you can cross-post between them automatically.
Specifically, you can configure your accounts such that when you post on Instagram, that post is automatically shared to Facebook. Unfortunately, it doesn’t work the other way around. In part this is due to Instagram’s history as a closed, mobile-only platform, and in part it’s because Instagram is an image-focused site. If you could post text-only from Facebook to Instagram, it wouldn’t go over well.
Interested? I know I am. Instagram posts might not be formatted ideally for Facebook, but they fill out your editorial calendar, they help inform your Facebook followers that you have an Instagram account, and they can do well enough as posts in their own right to make it worthwhile.
What You Need to Cross-Post Between Instagram and Facebook
Now, since this feature seems to be mostly used by businesses, you might think there’s some deep requirement, some third party platform, or some app you need to use to activate it. Fortunately, there’s not.
Here’s everything you need:
- An Instagram account. Your Instagram account will be the source of the posts you cross-post to Facebook.
- One of the Instagram Apps. As far as I’m aware, you currently cannot link accounts via the desktop platform or using third party apps. You need to perform the appropriate steps through either the iOS or Android apps.
- A Facebook account. Obviously, you can’t cross-post to Facebook without having a Facebook account to post to. You need to know your username and password, so if you’re one of those saved login people who hasn’t had to type it in years, it might be a good idea to remember it.
Additionally, if you want to post to a business Page rather than a personal Profile, as is mentioned in the title of this post, you need a Page. You don’t need to do anything special to configure the Page to accept cross-posts, but you do need to have Admin rights for the Page in question. Only the Admin can enable cross-posting, and only the account owned by the Admin on Instagram can be the source of the posts.
As far as I’m aware, you do not need your Instagram profile to be converted into a Business Profile in order to cross-post. Plenty of people use Instagram to Facebook profile cross-posting without any business interactions at all. That said, the Instagram business profile features can be pretty worthwhile, so if you’re doing all of this for business, you might as well hit the button.
Linking Instagram to Facebook
The actual process for linking Instagram to Facebook is extremely simple.
First, go to your Instagram profile on your app, either the iOS or the Android app. Either one is fine, and the instructions are the same for both. Find and locate the “burger button” or the three stacked lines and tap it. This opens a menu, from which you can tap the Settings button, bringing you to the settings menu.
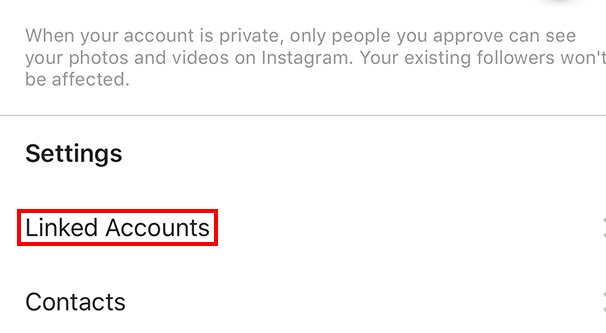
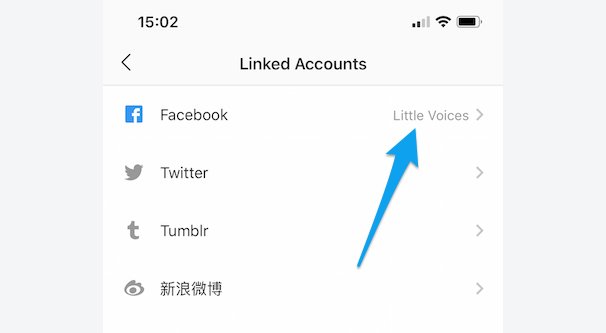
In the Settings menu, find the Account option and the nested Linked Accounts option. Tap that and choose Facebook as the social network you want to link. Instagram can also link other social networks, like Twitter, if you want to make Instagram your primary source of content.
Once you tap the Facebook option, you will be prompted to enter your Facebook information into their oAuth authentication screen. You’re logging into Facebook, not giving Instagram your information, so don’t worry about security, at least not any more than you normally do.
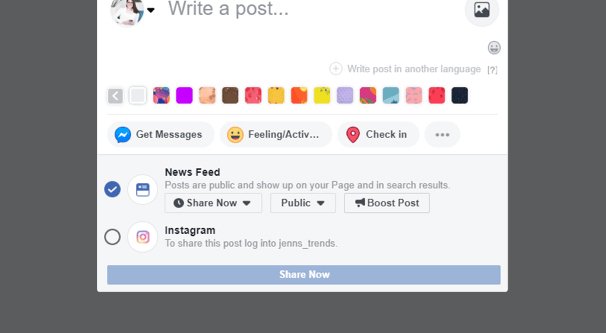
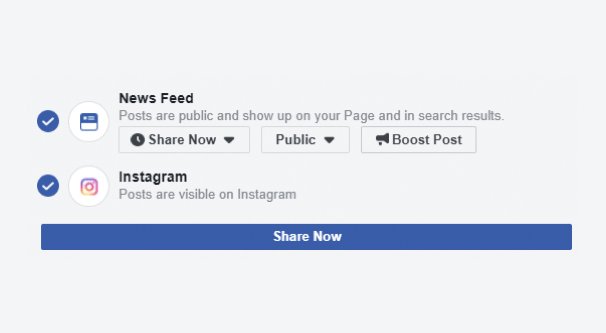
Important note: By default, Facebook integration with Instagram is with your profile. If you don’t choose the appropriate option in this final step, you will be sharing your business Instagram posts with your personal Facebook profile, not your Facebook brand page.
When you have logged into Facebook, you will see a “Share To” option. It should be set to your Facebook profile. Tap this and change it to your Page.
If your business Page does not show up in this menu, you need to double-check to make sure that you actually have an Admin role with the page and that you logged into the correct Facebook account.
If you do not have a Facebook Page, but a Page exists for your business – like if it was created years ago as part of Facebook’s abandoned push to be the next Yelp or Google Places – you may be able to claim the unclaimed page directly through Instagram.
To do this, go to your Instagram profile and tap your way into the settings menu as described above. Find the Business section and tap Claim Facebook Page. You will then need to log into Facebook and follow the process for claiming an unclaimed Facebook page. Generally, this means identifying the page, submitting documents that prove you are the owner of the business, and merging the Page with your account.
Additional Value: You can add your Facebook Page to your Instagram Account as an official link, not just in the back end, but publicly. In order to do this, you need to have an Instagram Business account, so make that conversion if you haven’t already.
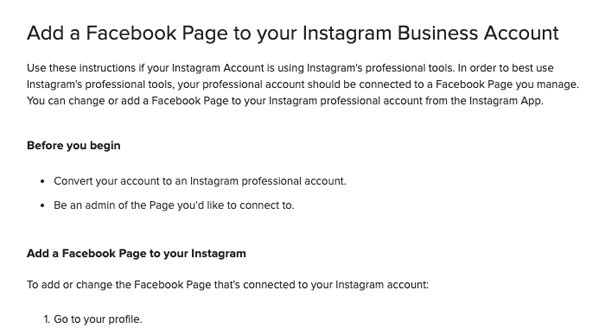
It’s very easy to convert an Instagram account into a business account. Simply go to your profile and tap the three stacked lines button, then tap Settings. Find the Account section and tap it, then tap Switch to Business Account. Instagram will ask you some details about your business, such as category and contact information. Fill this out and tap Done, and you’ll be given access to business features like Insights and other tools.
From here, go to your profile and tap Edit Profile. Find the Business Information section and find Page, and tap it. Instagram will look for any Pages connected to a Facebook Profile you have already linked. Choose your Page, or tap to create a new Facebook Page, if you don’t have one for your business.
Disconnecting Instagram and Facebook
Sometimes your link between Instagram and Facebook may get messed up somehow. I’ve seen it happen because of users logging in from multiple devices, from some odd bugs with changing admin ownership, and just because it’s a day that the sun came up and some inscrutable part of the Instafacegrambook system flipped a bit wrong.
Generally when troubleshooting the problem, you’re going to need to disconnect and reconnect your accounts. Unfortunately, disconnecting your account links will remove shared data from Insights. You won’t be able to see historical data shared between the two platforms. Once you reconnect you will be able to record new data, but the old data is gone. As such, be sure this is a step you want to take.
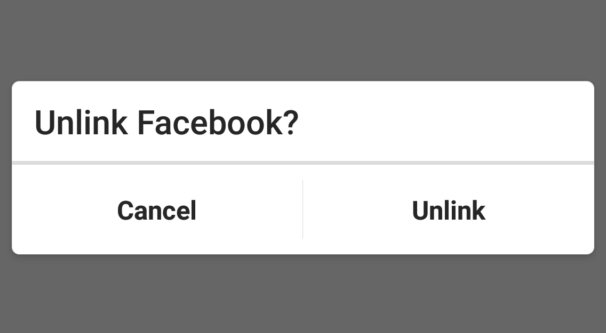
To disconnect your Facebook and Instagram profiles, log into Instagram on one of the apps. Tap the three stacked lines button and tap the Settings option from inside it. Find the Account section and tap it.
In the Account section, find Linked Accounts and tap it, then find Facebook. Tap Facebook – or whatever other site you want to un-link – and tap the Unlink button. In iOS this is labeled Unlink Account, while in Android it’s just Unlink. You will need to confirm that you want to remove the link, but once you confirm it, the link will be severed.
Next, go to your Facebook Account. In the upper right hand corner of the website, find the Settings section. Scroll down and find the Apps and Websites section on the left, near the bottom. Alternatively, click on this link to be taken there directly.
Under the Websites section, you should be able to find Instagram. If the link there shows as active, revoke permissions. If it’s not visible or shows up in either Expired or Removed, you should be good to go.
Note that this process is the same for other sites; go to Twitter or Tumblr and find their App Permissions section in their settings to verify that a link has been severed there as well.
Once you have verified that the link is no longer active from both sides, you can go back into Instagram and re-link your accounts. As usual, make sure that you’re choosing to share to your page and not your profile if that’s your intention.
Third Party App Options
In some cases, you may run a business that you do not want linked to your Facebook profile. If you’re not watchful, you may run into issues where the Instagram auto-cross-poster will post to your profile rather than your page. In these cases, you may be better off using a third party app to post to both platforms instead of using the cross-poster. There are a number of apps you can use, so here are a few options you might consider.
Buffer: Buffer is one of the best social media scheduling tools around, and it’s been fun watching them grow from a scheduling toolbar to a robust platform over the last few years. If all you want to do is schedule posts across both Facebook and Instagram, you can do so with the free account. Otherwise, $15 per month for the Pro plan lets you use a bunch more advanced features, gives you a higher cap on scheduled posts, and lets you link up to eight accounts.
Sendible: Sendible is a high level social media platform with a variety of different major features, from scheduling to social listening and beyond. The starter plan is only $30 per month and will get you the ability to schedule posts on both Facebook and Instagram, along with a bunch of other options if you want to use them.
AgoraPulse: AgoraPulse is another great professional platform that works with both Facebook and Instagram, as well as other networks like Twitter, YouTube, and LinkedIn. I will say that this platform tends to be aimed at larger businesses and agency-level customers, so their basic plans start at a whopping $90 per month. You get a huge array of features for that price, some of the best in the business, but it’s still a large price tag for some of you to stomach.
Hootsuite: Hootsuite is one of the oldest and most robust social media platforms, and they’re also highly modular. They have a huge array of different features you can pick in an almost ala carte fashion, increasing in price as you need more features and more integrations. A simple integration with Instagram and Facebook is likely to run you around $30 per month, but you can easily spend more if you want more advanced options.
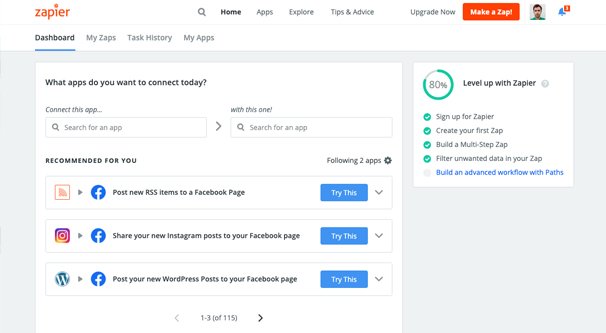
Zapier: Zapier is a little different from the others on this list because it’s more of an automation engine than a platform. They have API access for hundreds of services and apps, so you can do a ton of different things. When connecting Instagram and Facebook, they have four integrations which can make your life easier. Pricing is also cheap and simple.
Your Choice: There are easily hundreds of social media platforms out there, many of which can access both Facebook and Instagram. Do you have a favorite I didn’t list? If so, let me know in the comments below. I’m always interested to see what my users are doing.